html5中的声音(二)
由上,我们已经可以很简单的在页面中播放声音了,就像这样:1
<!DOCTYPE html>
<html>
    <head>
        <meta charset="utf-8" />
        <title>Audio</title>
        <body>
            <button id="play">play</button>
            <button id="stop">stop</button>
            <button id=""pause>pause</button>
            <script type="application/javascript">
            (function(){
                var $ = function(selector){
                    return document.getElementById(selector);
                },
                play = $("play"),
                stop = $("stop"),
                pause = $("pause"),
                Audio.prototype.stop = function(){
                    this.pause();
                    this.currentTime = 0;
                },
                player = neew Audio("path\to\audio");

                play.addEventListener("click",function(){
                    player.play();
                },false);

                stop.addEventListener("click",function(){
                    player.stop();
                },false);

                pause.addEventListener("click",function(){
                    player.pause();
                },false);

                })();
            </script>
        </body>
    </head>
</html>
嗯,但是,这样好像并没有什么很酷炫的东西,样式什么的,去我的github上看成品,虽然也还是很难看。。。
好了,我们来点更酷炫一点的东西。我们这里要用到一个高级接口,叫做audiocontext。具体的接口说明可以参考MDN,和W3C上的解释。
audioContext 接口
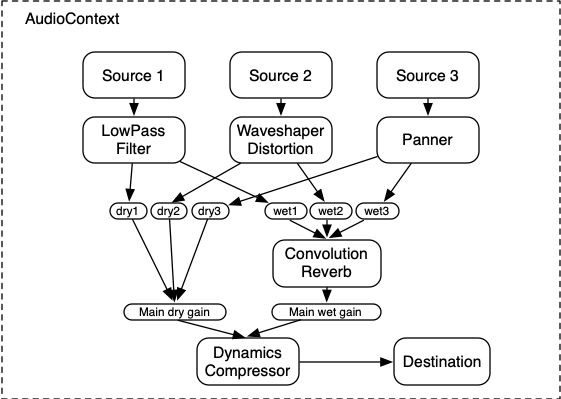
嗯,这个接口其实蛮有意思的,它并不能直接播放音源,但是它可以解析音源,并对音源进行一些处理,然后将音源传回给Audio接口进行播放。嗯,我们来看一张图。
|——————————————————-|
|              audioContext                              |
|   |—————-|               |—————-|  |
|   |auidoNode |     =>     |  duration   |  |
|   |—————-|               |—————-|  |
|——————————————————-|
很酷炫的字符图有木有~!这里有字符大小的bug,所以大家勉强的看一下,看不懂的,可以去github上找markdown。其中audioNode可以理解为音频源,duration理解为音频播放点。好了,这个是比较简单那的,复杂一点的,看下图:

嗯,
audiocontext其实是给了一个音频的执行环境,在android开发里,context叫做上下文,嗯,并不知道js中叫什么。。。胡子哥的解释是环境,我觉得挺恰当的,所以也理解为环境。在这个环境中,我们可以对音频进行处理和节流还可以对字符串的输入进行音频化处理就是解析成声音啦。嗯,这里要注意一点的是,audio和audiocontext并不是同一个环境。。。他们之间的关系可以参照下图。
|——————————————————|
|                  audio                                      |
|   |————|                |—————-|    |
|   |source   |    =\=>   |  duration   |    |
|   |————|     |        |—————–|    |
|———————-|——————————|
                             |
                             |
                  |——-|——————————————————|
                  |         *       audioContext                                    |
                  |  |—————-|        |————|       |———|  |
                  |  |auidoNode | =>  |  buffer  | =>  | Dest   |  |
                  |  |—————-|        |————|       |———|  |
                  |—————————————————————|
这里的理解参照了胡子哥的博客和W3C的解释,英语不是很好,可能理解的不是很到位,有什么错误,大家可以指出来,相关的链接在之前已经给出。
好了,理论讲完了,开始看看怎么做。
实例化
嗯,不同的浏览器对这货的支持并不是一样的,根据各浏览器厂商一贯的尿性,你会看到一堆的虽有私有接口。下面给出一个比较保险的实例化方案。1
var Context = window.AudioContext || window.webkitAudioContext || window.mozAudioContext || window.msAudioContext,
context = new Context();
播放
播放的基本逻辑是:新建buffer -> 获取buffer -> 链接播放点 -> 播放
下面给出函数代码。1
function playSound(buffer) {
    var source = context.createBufferSource();
    source.buffer = buffer;
    source.connect(context.destination);
    source.start(0);//source.noteOn(0);
}
这个比较简单哈,来个复杂点的,异步音频获取并播放。
异步播放
这里要使用XMLHttpRequest接口,这个接口大家都很熟悉啦,直接上代码。1
var Context = window.AudioContext || window.webkitAudioContext || window.mozAudioContext || window.msAudioContext,
    context = new Context(),
    loadAudio = function(url){
    var request = new XMLHttpRequest();
    request.open('GET',url,true);
    request.responseType = "arraybuffer";//这里必须为缓存数组的格式
    request.onload = function(){
        context.decodeAudioData( request.response,function(buffer){
            playSound(buffer);
        },function(err){
            return err;
        });
    request.send();
    }
}
playSound()方法参照上文即可。
XMLHttpRequest使用的arraybuffer类型(缓存数组),对于这个类型,可以点击这里获取更详细的资料。
嗯,我们这里可以实现一个loadAudio的封装,应该不是很难。1
define(function(require,exports,module){

    exports.setconfig = function(context,url,callback){
        module.context = context;
        module.url = url;
        module.onload = callback;
    };

    exports.start = function(){
        if (typeof(module.url) === "string") {
            loadBuffer(module.url);
        }
    };

    var loadBuffer = function(url){
        var request = new XMLHttpRequest();
        request.open('GET', url, true);
        request.responseType = "arraybuffer";
        console.log(this === module);
        var loader = module;
        request.onload = function () {
            loader.context.decodeAudioData(request.response, function (buffer) {
                console.log("this");
                loader.onload(buffer);
            }, function (err) {
                return err;
            });
        };
        request.send();
    };
});
嗯,上面封装了一个loadAudio,可以直接用来获取和播放异步音频。不想异步的话,把XMLHttpRequest.open()的true改为false。引用的话,用了seajs.1
<!DOCTYPE html>
<html>
<head lang="en">
    <meta charset="UTF-8">
    <title></title>
</head>
<body>
<script type="application/javascript" src="../node_modules/seajs/dist/sea.js"></script>
<script type="application/javascript">
    seajs.config({
            base: "./js"
    });
    seajs.use("../js/loadAudio",function(loadAudio){
        var context = new AudioContext();
        loadAudio.setconfig(context,"../audio/test.mp3",function(buffer){
            console.log("this");
            var source = context.createBufferSource();
            source.buffer = buffer;
            source.connect(context.destination);
            source.start(0);
        });
        loadAudio.start();
    });
</script>
</body>
</html>
嗯,这个多说一个,其实,这里可以并不用提供完整的音频也是可以播放的,也就是说,我们可以提供Http报头为text/plain的response来播放音频,这样的话,你就可在音频上加密了~!嗯,这里给出一个php的server1
<?php
	$token = $_GET['token'];
	$filename = "../audio/".$token.".mp3";
	echo $filename;
	if(file_exists($filename)){
		echo file_get_contents($filename);
	}else{
		echo "hello";
	}
?>
完整案例请参考github
分析播放
对于音频接口还给出了一个analyser接口,可以用来分析音频的强度,嗯,我们可以用来绘制音频图谱。基本逻辑变成了这样:
新建buffer -> 获取buffer -> 链接分析点 ->重新连接到播放源 -> 播放
analyser可以用conetxt.createAnalyser()来获得。嗯,我们还是来看代码:1
//这里偷个懒,直接使用seajs的模式
seajs.use("patn\to\loadAudio",function(loadAudio){
    var context = new AudioContext(),
        analyser = context.creatAnalyser(),
        displayWave = function(waveByteDate){
      		var  canvasContext = document.getElementById("display").getContext('2d');
      		canvasContext.fillStyle = '#66ccff';
      		canvasContext.clearRect(0,0,1024,100);
      		for(var i = 0; i < waveByteDate.length; i++){
      			var height = (0- (waveByteDate[i]/255 * 100));
      			canvasContext.fillRect(i,100,1,height);
      		}

      	};
    loadAudio.setconfig(context,"paht\to\audio",function(buffer){
        var source = context.createBufferSource();
        source.buffer = buffer;
        source.connect(analyer);
        analayer.smoothingTimeConstant = 0.8;
        analayer.connect(context.destination);
        var handler = setInterval(function(){
      			var waveByteDate = new Uint8Array(analyser.frequencyBinCount);
      			analyser.getByteFrequencyData(waveByteDate);
      			displayWave(waveByteDate);//绘制波形
      		},10)
        source.start(0);
        source.ended = function(){
      		document.getElementById("wave").getContext("2d").clearRect(0,0,1024,100);
      		clearInterval(handler);
      	}
        source.stop = function(){
            if(!source.stop){
            source.stop = source.noteOff;
            }
        };
    });
    loadAudio.start();
});
连接到分析节点(analyer)后,我们这里要给定一个参数smoothingTimeConstan(平滑时间常数),这个参数的解释上对当前处理的最后一个缓存节点的最近的buffer大小和最后的buffer大小的平均值。
额,英语学得不好,翻译的磕磕碰碰的,大家可以看英文原版。
The smoothingTimeConstant property of the AnalyserNode interface is a double value representing the averaging constant with the last analysis frame. It’s basically an average
between the current buffer and the last buffer the AnalyserNode processed, and results in a much smoother set of value changes over time.The smoothingTimeConstant property’s value defaults to 0.8; it must be in the range 0 to 1 (0 meaning no time averaging). If 0 is set, there is no averaging done, whereas a value of 1 means “overlap the previous and current buffer quite a lot while computing the value”, which essentially smoothes the changes across AnalyserNode.getFloatFrequencyData/AnalyserNode.getByteFrequencyData calls.
In technical terms, we apply a Blackman window and smooth the values over time. The default value is good enough for most cases.
嗯,看懂了,有更好的翻译,请给我留言~!谢谢思密达。
我们将分析出来的数据,也就是这个analyser.frequencyBinCount,其实是一个无符号的二进制码,一长串~!1
var waveByteDate = new Uint8Array(analyser.frequencyBinCount);
analyser.getByteFrequencyData(waveByteDate);
这里进行了傅里叶变换,将声音变成了频率码,然后我们这里要把它变成一个好处理一点的8位无符号数组就是unit8array。因为,这是一瞬间的值,也就是静态值,所以在这个静态的数组里存放的是从低频到高频的所有频段的能量值。嗯,如果,觉得我说的,你看不懂,也可以参照这个博客。至于傅里叶变换,请在这里获取更多的东西。最后我们用canvas把能量槽画出来,就行了,刚才我们说到,这个值是一个一瞬间的静态值,所以我们要用不停的重绘,来显示变动。canvas的讨论不在本题范围内,我就不多说了。
好了,今天先讲这么多,明天讲如何编辑音频。
